This blog is dedicated to my Final Year Project which will be an Urban Installation created in an abandoned house, where the 4 seasons are unleashed. Within this blog, you will know how my project has progressed including the problems which I will encounter and also the development of my final piece - Hafiza :D

Sunday, 7 March 2010

Wallpaper Cutouts for the Spring Wall

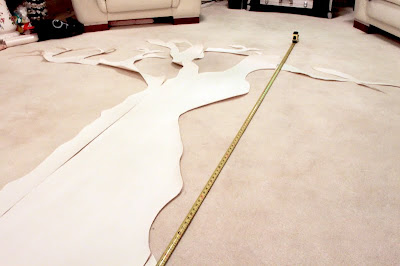
Here are some more photographs of the wallpaper cutouts I have done so far for the Spring Wall.


The photograph above is the layout of how these cutouts will look on the wall. I still need to add more to it yet.

Here is a photograph of the main tree that will be on the left side of the spring wall. It is 100" long and therefore will fit to the height of the wall.


Because the tree is huge, I had to cut it out on several pieces of wallpaper. At the moment it looks quite plain. I might add more to it, or I might add spring buds to it in order to show it is Spring.

Thursday, 4 March 2010

First set of wallpaper cutouts for Spring

Before I start cutting out the wallpaper cutouts for Spring based on the measurements I took of the walls at the location I sketched out what the Spring wall would look like including the measurements.


This photograph shows the first cutouts I have done.


The top 2 cutouts are for the right side of the sketch drawing. The 'grass' along the bottom of the above photograph is 105" long and is 22" in height. I will be adding another 4 inches to the flat ends of some of the grass strands.


This is a close up photograph of how I will be placing some of the cutouts leaving about 5mm gap between the cutouts.

What is my Special Study?


Materials Used to build Turntable

As my hand-built turntable is almost complete, I disassembled the platform to take a photograph of all the materials used to construct the turntable platform.

This is the photograph taken of the materials used:


On the left is the framework used as a race-track for the ball-bearings.
Top middle: Metal plates used for a TV stand, below that I have a metal clog that I place onto the end of the stepping motor which then rotates the top right hand board which fits onto the clog. The bottom right board is used to sit onto the stepping motor securing it with the 4 screws and nuts that are on the left of that board. and in the centre are all the ball-bearings I use to smoothen and balance the turntable when it is rotating with weight placed on top of it.
I also used a flat-head screw driver to tighten the clog to the stepping motor and a wrench to tighten the nuts.

This is a photograph of the stepping motor without the platform and also the board that connects to the stepping motor and to the Arduino.


Here is a photograph of my hand-built turntable (without the top board).

Tuesday, 2 March 2010

Changed idea of story outline

As weeks have gone by, and working on the special study I have been thinking of the main story outline of the piece. Based on how my piece will be displayed on the Degree Show I would like my animation to loop. Since my last updated idea, I have changed it once again. At the moment, I am thinking not to use the video footage of 'fake' break in into the house, this is because my piece will not loop.

Idea for Degree Show at The University of Huddersfield

For my Degree Show at the university, my piece will be based more on the construction side. For example, a stop-frame animation of the wallpaper-cutouts appearing on the walls. Next, a stop-frame animation of colour appearing onto the wallpaper-cutouts, which is then followed by short animations based on the seasons.

In the end of the construction piece, I will make a video footage of the urban installation which will be played after the construction piece.

One Day Viewing of Urban Installation at it's location

Because my actual installation is located in Halifax. I will invite everyone during one of the days of the Degree Show to come and view the installation itself. Viewers will then see my urban installation running constantly. Therefore, the idea of the break in footage would not work and also because I will not be able to display the construction piece as the construction of the walls will already be completed, i.e. stop-frame animation of wallpaper-cutouts and of colour. So then the viewers arrive to the location, they will walk into a room that is full of colour and cutouts. However, to make it interesting and last slightly longer, I will have the short animations looping. For example in Spring, birds flying will be a short animation. Another set of short animations will be displayed for the Summer, Autumn and Winter. When the projector rotates back to spring, a different animation will be played. This time it may be a squirrel after an acorn, etc. Same for the other seasons. So when the viewers are viewing the piece, they will not be looking at the same animation over and over again.


Monday, 1 March 2010

Special Study: Stage one almost complete

The first stage of my special study is almost complete. The hand-built turntable is almost complete. Today we were going to test the weight capacity of this turntable.

But before we were going to test the weight capacity, we ran into a problem. The problem we encountered was that the stepping motor would miss a step which stopped it from rotating smoothly. The stepping motor is programmed to rotate in 4 steps. However because it was missing a step it was not working successfully.

This is a close up photograph of the board that is used to tell the stepping motor how to rotate via steps and what speed.


I have 4 of these blue chips attached to the board, each one represents a step. As I have 4 of these, my stepping motor rotates in 4 steps. However, something was going wrong in order for the stepping motor to miss a step.

On Thursday we spent an hour trying to find out the cause of the this problem, however we were unsuccessful. We then spent another 2 hours on it today and finally managed to figure out the problem. The first problem we figured out was in a line of the board that connected to the stepping motor and to the Arduino and the second problem was in the a couple of wires that were on the board itself.

Before we figured out the problem, we double checked all the wires on the board to see if they were placed in the right place. We also thought that one of the magnets in the stepping motor may have failed to work, and since there is no way to test that, we used another stepping motor but we were having the same problem.

To solve the problem, we replaced the wires that weren't working and we used a different line on the board. As everything was running successfully before, I thought we may encounter this problem again if any of the other wires fail to work later during the progress of the project. However, once we have this working successfully with the weight capacity we would solder the board so this wouldn't happen again.

Once the problem was solved, we tested the weight capacity. Here is a video footage of the turntable holding two Apple laptops that weigh approximately 6.5kg which is more that I will be using. We set the speed of the rotation quite slow in order to make sure that each step was being used.


As you can see from the video footage that it is rotating successfully with the weight of the two Apple laptops. At first, the turntable would stop and jitter in place particular place but that was due to the ball-bearings that were placed randomly. Once I placed the ball-bearings in a track this issue was solved.

We next increased the speed of the rotation slightly. Here is the video footage showing the turntable running smoothly and to a standard speed rate.


As you can see that this hand-built turntable is running smoothly with the weight of 2 Apple laptops. Therefore, it will be able to hold the weight of the projector, which weighs approximately 3.5kg.

The final step for this construction process is to solder all the wires to the board and to built a box for the turntable to sit in and to protect the board and wires so it is portable.

The next stage of my special study is the coding. Via coding in the Arduino program, I will tell the turntable when to rotate, how much degrees to rotate and when to stop, etc. I will also be required to code in Flash because the animations will be created in this software.

Room Measurements

I will be starting to make the wallpaper cutouts for each season at home, before taking them to the house to paste up on the walls. I will photograph each stage of pasting the wallpaper cutouts which then would become a stop-frame animation of the seasons taking over.

But before I do that, I went to the house and measured the room I will be working in and also measured each wall so I can begin the cutout process.


Thursday, 25 February 2010

Style Animations shown on wall

Below are two video clips, one of the silhouette animation (left) and other is the line-drawn animation (right). The animations are shown on an image of the previous wallpaper cutout experiment. I have created these two small animations to see which style technique will work best for the animation when being projected onto the walls.


From both video clips, I think that the silhouette animation works better with the wallpaper cutout. Therefore so far I think I will stick to the silhouette idea for the animations. I will try a few more short animations and see if they work well too.

Wednesday, 24 February 2010

Style idea for the short animations

Over the last few days, I have been working on one of the small animations that will be projected onto the wall. The animation I have been working on a simple animation of a bird flying from one side of the wall to the other.

When thinking of which style to do the animation in, I had to make sure that the style would work on the wallpaper cutouts that would be pasted onto the walls.

I first tried to do a simple line drawing animation.

Here are the frames I designed to create the animation. I chose to create the short animation in only 9 frames.
This is the animated version of the above frames.


I am unsure about this style technique and therefore thinking about the wallpaper cut outs on the walls, I thought about creating a silhouette animation and see if it works better than the line-drawn animation.

Here are the individual frames for the silhouette animation:

This image below shows the motion of all the frames and how it would form into a smooth animation.

Here is a video clip of the silhouette animation:


As you can see that this animation does work well. I will need to test this on the wallpaper cutout and see if that works well too.

Thursday, 18 February 2010

Solving issue: PROGRESS

We have tested the platform to see if it works before attaching the ball-bearings and it works successfully.

Here is a video footage of the working turntable:


However, the platform is slightly unbalanced and does rattle too. Therefore, I just placed ball-bearings in freely to see if it would make any difference.

Here is the video footage showing the ball-bearings:


Once I have placed the wooden rings in place as previously mentioned this self-made turntable should work successfully. The final touch of this production is to make sure that it will be able to handle the weight of the projector. Therefore as a tester, we placed a laptop on the platform to see if it can handle the weight.

Here is the video footage of the laptop tester:


As you can see from the above video that the turntable is working successfully. As my next step, I will attach the ball-bearings and wooden rings. Once this is complete, we will test it again.

Saturday, 13 February 2010

Building Platform

Over the last week, I have been building a platform that would allow the projector to sit onto it and rotate when required to. Here are a few images of what I have come up with so far.

The image below shows the bottom of the platform where the stepping motor is. The stepping motor is attached to the bottom board with 4 machine screws and nuts.


The 4 machine screws are also attached to the bottom metal plate. The metal plates in the centre has bearing balls allowing the plates to rotate. I purchased this from B&Q, it is used to rotate a TV once it is attached to the TV stand. However, because it has a weigh capacity of 150kg I only need it to hold approximately 3.5kg. Therefore, I thought it would work for my purpose.


This is how the top of the platform looks. I have attached another board to the top, this is where the projector will sit on. When using your hand to spin the top board, it has enough friction to spin without using any strength which is very good as the stepping motor I am using is only 12volts.


Because I have the steel plates in the centre of this, the top board is slightly unbalanced. Therefore to overcome this issue, I will be making two inner wooden rings placed around the steel plates in which I will place bearing balls allowing the board to spin with balance.

My idea of the two inner wooden rings are similar to the traditional way of handing making embroidery. I will be creating something similar to the wooden frames and attach them to the bottom board, leaving enough gap between the rings to place the bearing balls. However after speaking to some people, I have been told that this way would cause more friction and whether the 12volt motor will be able to rotate the top platform.

I will be speaking to my tutor about this today, and also test the platform without having the bearing balls attached to the board.

Tuesday, 9 February 2010

Solving issue: Rotating Projector PROGRESS

This is the next step as previously mentioned.
The image below, shows the setup of Arduino and a slightly more powerful stepping motor.


This is a video footage of the stepping motor working successful. As the stepping motor only has a pin, I have attached a piece of white paper to show that it is spinning.


The next step is to build a platform which will sit on the stepping motor and allow the top platform to rotate.

Monday, 8 February 2010

Solving issue: Rotating Projector

Over the past couple of weeks, I have been trying to solve the issue about how to rotate the projector. These are the results so far for the 4 ways previously mentioned.

1> Using a turntable motor:
I spent a good few days looking for the complete turntable motor or something similar, however I had no luck. I did come across record-players and deck turntables, however these were from £200 - £400. It would be cheaper if I just built one therefore this way is discontinued.

2> Using a stepping motor and build the platform:
With help from my tutor, I have managed to get hold of a stepping motor. The next challenge for this is to build a platforms that would rotate via the stepping motor. This way is still in progress.

3> Using a windwiper motor and build the platforms:
I went to a few places in search for a windwiper motor. However, I was unable to get hold of one therefore the way is discontinued.

4> Build the whole thing myself, using a drill as a motor:
This way is still in use at the moment. If the stepping motor does not allow the platform to rotate, I will use the idea of using a drill as a motor in order to solve this issue.

From the above list, ways 2 & 4 are still in process and therefore I have a good chance in order to solve this issue.

Tuesday, 26 January 2010

Solving issue: Rotating Projector PROGRESS

With the help of my personal tutor, we have managed to get the stepping motor working via Ardiuno.

This was just an experiment to see if this idea (way 2) of using a stepping motor would work in order to make the projector rotate.

Below is an image of the Ardiuno setup with the motherboard and stepping motor:


This image below is a preview of the coding that is sent to the stepping motor in order for it to spin around.


This is a video footage of the stepping motor spinning.


The experiment was successful, the next step to solve the issue of rotating the projector is to get a slightly more powerful and get that working successfully.

Monday, 25 January 2010

No electricity in the house

I will need to use a projector and lighting in order to complete my project. However, there is no electricity in the house and no live feed wires in order to make a junction box.

To solve this issue, I will be using a petrol based generator that will allow me to use the projector and lighting.

Issue Solved

Monday, 11 January 2010

Preparing for any problems or issues

In order for my project to run smoothly I searched for any problems or issues that I may encounter.

When thinking through the technique side of my project the main issue I will encounter will be how to rotate the projector when told to do so.

There are 4 ways in which I could do this:
1> Using a turntable motor
2> Using a stepping motor and build the platforms
3> Using a windwiper motor and building the platforms
4> To build the whole thing myself, using a drill as the motor.

My first aim is to find a cheap turntable motor that could hold the weight of the projector which is approximately 4kg.

This will be the Special Study of my final piece.

Sunday, 29 November 2009

More Wall Experiments

This is another wallpaper experiment I did, however with this one I pasted it onto the brick wall as the other wall was boarded.


The technique works great. There was just one issue about pasting it onto the wall without it getting any dirt onto it and since the whole place is dirty I wasn't sure how to come around this issue. Therefore, to solve this issue I thought it would be wise to paste the wall and then stick the cutout to it. This way the result would not get much dirty attached to it.

After attaching the cutout to the bricked wall, I thought i would attach it to the other wall, which I was working on yesterday. The photograph below shows the result of the cutout onto yesterdays cutout.

I must admit that this does not look so good. The cutout of the grass which I pasted onto the wall yesterday caught a lot of dust from the brush I was using, therefore it kind of blends with the wall, and the cutout I pasted today doesn't. But when I use this technique for my main piece I know what I need to do.

Saturday, 28 November 2009

Wallpaper Experiment

This is a quick video made from photographs taken as I was doing the wall experiment.

Wallpaper Cutout

Close up of cutout pasted onto the wall

Full view of cutout pasted onto the wall

This is just a beginning experiment for the wallpaper pasting idea. I will be add a few more cutouts to the wall as the grass doesn't quite work on its own. However, the wallpaper pasting technique works well and I think I will use this technique for my final piece but also include projections of drawings that will add detail to the wallpaper cutouts.

Chosen Room Location

These are photographs taken of the room that I have chosen in the abandoned house.
The following photographs also explain how I have planned out the Seasons in the room.

The left corner of this photograph will be Winter moving across the right to Spring.

The corner in the centre of this photograph will be Spring going onto Summer.

This wall is going to be Summer, hence the two windows.


The corner in the centre of this photograph will be Summer going onto Autumn.


The left side of this photograph is Autumn, and Winter moving across to the right side.


Spray Paint Experiment

This is a quick video of photographs taken as I was doing the spray paint experiment.

End Result Photograph

First image taken of the experiment

Close up

This is the spray paint wall experiment. This technique does work well, especially for the much bolder areas of the animation if used this technique. However, this technique cannot be used for detailed areas of the piece that I intend to make.

Sunday, 22 November 2009

Visuals of Nature

I have started to sketch out some visuals for the animation. I have not decided whether these would be drawn directly onto the walls or projected.

These two sketches are of wall-climbers.

Media: Watercolour Pencils & Charcoal


Media: Dark & Light Charcoal & Watercolour Paints

Saturday, 21 November 2009

Wallpaper Tryouts

As I have decided to have a mixture of drawing techniques, I thought of trying out different types of media onto different types of wallpaper. This experiment will help me choose which type of media would work best for the piece.

Material: Cardboard__ Media: Spray Paint

Material: Wallpaper__ Media: Gesso & Acrylic Paint

Material: Pattern Wallpaper__ Media: Pastels & Charcoal

Material: Pattern Wallpaper__ Media: Acrylic Paint, Thick strokes

Material: Textured Wallpaper__ Media: Ink, fine brushed strokes

Material: Textured Wallpaper__ Media: Spray paints, stencil technique

Material: Slightly Textured Wallpaper__ Media: Charcoal


Material: Textured Wallpaper__ Media: Acrylic Paint, quick thick strokes

After doing these experiments, I went to my chosen location and realised that there isn't actually any sort of wallpaper on the walls. It is just bricks and boards, therefore I will experiment with materials directly onto the walls and see which would be perfect for my piece.

Friday, 20 November 2009

Improvement of Idea

From discussion and feedback from tutors over the last couple of weeks, I have developed my idea and decided on what style I would use for my piece.

My new idea for my animation piece is going to be a mixture of hand drawn images that would project onto the walls of the abandoned building as well as draw physically onto the walls in certain areas. I will also include objects such as snow, leaves etc to add a sense of realism to the piece.

This image is a rough visual of the piece, without the objects.

Update to Storyline of Animation

I have changed the storyline of the animation slight. The theme of the animation will still be nature and it will still be based on the seasons. However, to make this an interesting piece, I have decided to make a video footage, faking a break in into the abandoned house and snooping around all the rooms. The video then would show a source of light in one room. The light is coming from a bottle that has been on a window-ledge for quite some time. The bottle is then by accident, dropped off the ledge and everything that bottle holds is unleashed into the room... this would be the end of the video footage, for now.

Within the bottle are the four seasons - Spring, Summer, Autumn and Winter, which are unleashed into the room. The animation would begin from here. The first season unleashed would be Spring starting to crawl up one wall, as it crawls to the next wall the season changes to summer and so on. Objects would be placed and recorded for certain seasons, like leaves for autumn to get a sense of realism. Some bits of the animation will be drawn directly onto the wall, whereas others will be projected.

At the end of the animation, the whole room would be covered by the seasons. I have not decided whether or not to have another video footage of the complete room and leaving the abandoned house.

Wednesday, 4 November 2009

Digital Tryout


This image was created by using the pen tool in Photoshop. To blend the drawing with the photograph I used a scattered brush edge to show that the wall-climber has been chalked onto the wall. This does work well, however I believe it won't be as successful as I want this project to be.