This blog is dedicated to my Final Year Project which will be an Urban Installation created in an abandoned house, where the 4 seasons are unleashed. Within this blog, you will know how my project has progressed including the problems which I will encounter and also the development of my final piece - Hafiza :D

Thursday, 25 March 2010

Spring Wall Progress

I have been working on the wallpaper cutouts for the Spring Wall over the last few weeks as a starter whilst working on the turntable. Now that the first stage of the turntable is complete, I have managed to complete the cutouts for the Spring Wall.

Here are a few photographs taken during the cutout process:

Rather than cutting out the wallpaper cutouts at the location, I decided to cut them out at home as it takes quite some time and also because it is extremely cold at the location.


This process is quite tricky as I have to get the measurements accurate of the cutouts so they can be pasted onto the walls easily. Therefore, I worked from the measurements I had taken a couple of weeks ago and also used an image of the wall so I had a visual idea of how the cutouts would look when pasted onto the wall.


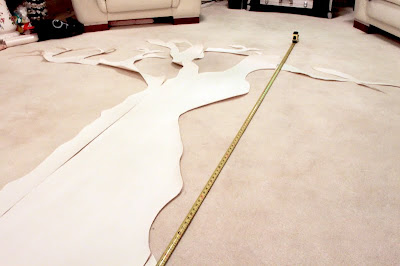
When I had completed majority of the cutouts, I laid them out in a bigger room to get a visual appearance of the full wall.

Once I was happy with the visual appearance, I took the cutouts to the location and pasted them onto the wall.


Here is a quick preview of the Spring Wall Construction:


I will be using the photographs taken of the Spring Wall Construction for my Final Piece as a stop-frame animation, where the cutouts will slowly appear onto the wall.


Thursday, 18 March 2010

Stage One Complete!

The first stage of the Special Study is complete: Building a turntable.


The above video shows the complete turntable in motion. All the wires are soldered onto the strip board permanently and therefore will not disconnect when being moved around.

The next stage of the Special Study is the coding that will instruct the turntable when to rotate, how much degrees to rotate and then to stop.

For now, Stage 1: Construction of Turntable is complete!

Wednesday, 17 March 2010

Squirrel eating animation

I have added to the squirrel animation, by getting it to stop running and eat an acorn and set off again.

Here is a preview of the animation.

Thursday, 11 March 2010

Squirrel Animation

Before I create the full animation of the squirrel, I decided to create a really short animation of the squirrel running across the screen.

Here is the video clip of the animation I have created. To give a sense of visual to the animation, I placed it in-front of wallpaper cutouts were the animation would partially be placed on the wall. I have also added colour too the cutouts as I will be adding colour to the wallpaper cutouts.


I have created another quick short animation of the bird and squirrel together.


NOTE: Ignore the black artefacts left in the first cycle, these are due to Flash CS4 exporting and is a long going issue that a lot of Flash users encounter and there isn't a solution for it just yet. However, the every time I export the file, I get different artefacts in different places and sometimes more places than others. But for my piece, I am not so concerned with it as the artefacts will add to my urban installation as ink prints of what was seen during my display.

Squirrel Silhouette

Monday, 8 March 2010

Squirrel Silhouette

The next animation I will be creating is the Squirrel running down a tree, picking up an acorn, eating it, and running back up the tree.

The image above is how the squirrel would look like.

Sunday, 7 March 2010

Wallpaper Cutouts for the Spring Wall

Here are some more photographs of the wallpaper cutouts I have done so far for the Spring Wall.


The photograph above is the layout of how these cutouts will look on the wall. I still need to add more to it yet.

Here is a photograph of the main tree that will be on the left side of the spring wall. It is 100" long and therefore will fit to the height of the wall.


Because the tree is huge, I had to cut it out on several pieces of wallpaper. At the moment it looks quite plain. I might add more to it, or I might add spring buds to it in order to show it is Spring.

Thursday, 4 March 2010

First set of wallpaper cutouts for Spring

Before I start cutting out the wallpaper cutouts for Spring based on the measurements I took of the walls at the location I sketched out what the Spring wall would look like including the measurements.


This photograph shows the first cutouts I have done.


The top 2 cutouts are for the right side of the sketch drawing. The 'grass' along the bottom of the above photograph is 105" long and is 22" in height. I will be adding another 4 inches to the flat ends of some of the grass strands.


This is a close up photograph of how I will be placing some of the cutouts leaving about 5mm gap between the cutouts.

What is my Special Study?


Materials Used to build Turntable

As my hand-built turntable is almost complete, I disassembled the platform to take a photograph of all the materials used to construct the turntable platform.

This is the photograph taken of the materials used:


On the left is the framework used as a race-track for the ball-bearings.
Top middle: Metal plates used for a TV stand, below that I have a metal clog that I place onto the end of the stepping motor which then rotates the top right hand board which fits onto the clog. The bottom right board is used to sit onto the stepping motor securing it with the 4 screws and nuts that are on the left of that board. and in the centre are all the ball-bearings I use to smoothen and balance the turntable when it is rotating with weight placed on top of it.
I also used a flat-head screw driver to tighten the clog to the stepping motor and a wrench to tighten the nuts.

This is a photograph of the stepping motor without the platform and also the board that connects to the stepping motor and to the Arduino.


Here is a photograph of my hand-built turntable (without the top board).

Tuesday, 2 March 2010

Changed idea of story outline

As weeks have gone by, and working on the special study I have been thinking of the main story outline of the piece. Based on how my piece will be displayed on the Degree Show I would like my animation to loop. Since my last updated idea, I have changed it once again. At the moment, I am thinking not to use the video footage of 'fake' break in into the house, this is because my piece will not loop.

Idea for Degree Show at The University of Huddersfield

For my Degree Show at the university, my piece will be based more on the construction side. For example, a stop-frame animation of the wallpaper-cutouts appearing on the walls. Next, a stop-frame animation of colour appearing onto the wallpaper-cutouts, which is then followed by short animations based on the seasons.

In the end of the construction piece, I will make a video footage of the urban installation which will be played after the construction piece.

One Day Viewing of Urban Installation at it's location

Because my actual installation is located in Halifax. I will invite everyone during one of the days of the Degree Show to come and view the installation itself. Viewers will then see my urban installation running constantly. Therefore, the idea of the break in footage would not work and also because I will not be able to display the construction piece as the construction of the walls will already be completed, i.e. stop-frame animation of wallpaper-cutouts and of colour. So then the viewers arrive to the location, they will walk into a room that is full of colour and cutouts. However, to make it interesting and last slightly longer, I will have the short animations looping. For example in Spring, birds flying will be a short animation. Another set of short animations will be displayed for the Summer, Autumn and Winter. When the projector rotates back to spring, a different animation will be played. This time it may be a squirrel after an acorn, etc. Same for the other seasons. So when the viewers are viewing the piece, they will not be looking at the same animation over and over again.


Monday, 1 March 2010

Special Study: Stage one almost complete

The first stage of my special study is almost complete. The hand-built turntable is almost complete. Today we were going to test the weight capacity of this turntable.

But before we were going to test the weight capacity, we ran into a problem. The problem we encountered was that the stepping motor would miss a step which stopped it from rotating smoothly. The stepping motor is programmed to rotate in 4 steps. However because it was missing a step it was not working successfully.

This is a close up photograph of the board that is used to tell the stepping motor how to rotate via steps and what speed.


I have 4 of these blue chips attached to the board, each one represents a step. As I have 4 of these, my stepping motor rotates in 4 steps. However, something was going wrong in order for the stepping motor to miss a step.

On Thursday we spent an hour trying to find out the cause of the this problem, however we were unsuccessful. We then spent another 2 hours on it today and finally managed to figure out the problem. The first problem we figured out was in a line of the board that connected to the stepping motor and to the Arduino and the second problem was in the a couple of wires that were on the board itself.

Before we figured out the problem, we double checked all the wires on the board to see if they were placed in the right place. We also thought that one of the magnets in the stepping motor may have failed to work, and since there is no way to test that, we used another stepping motor but we were having the same problem.

To solve the problem, we replaced the wires that weren't working and we used a different line on the board. As everything was running successfully before, I thought we may encounter this problem again if any of the other wires fail to work later during the progress of the project. However, once we have this working successfully with the weight capacity we would solder the board so this wouldn't happen again.

Once the problem was solved, we tested the weight capacity. Here is a video footage of the turntable holding two Apple laptops that weigh approximately 6.5kg which is more that I will be using. We set the speed of the rotation quite slow in order to make sure that each step was being used.


As you can see from the video footage that it is rotating successfully with the weight of the two Apple laptops. At first, the turntable would stop and jitter in place particular place but that was due to the ball-bearings that were placed randomly. Once I placed the ball-bearings in a track this issue was solved.

We next increased the speed of the rotation slightly. Here is the video footage showing the turntable running smoothly and to a standard speed rate.


As you can see that this hand-built turntable is running smoothly with the weight of 2 Apple laptops. Therefore, it will be able to hold the weight of the projector, which weighs approximately 3.5kg.

The final step for this construction process is to solder all the wires to the board and to built a box for the turntable to sit in and to protect the board and wires so it is portable.

The next stage of my special study is the coding. Via coding in the Arduino program, I will tell the turntable when to rotate, how much degrees to rotate and when to stop, etc. I will also be required to code in Flash because the animations will be created in this software.

Room Measurements

I will be starting to make the wallpaper cutouts for each season at home, before taking them to the house to paste up on the walls. I will photograph each stage of pasting the wallpaper cutouts which then would become a stop-frame animation of the seasons taking over.

But before I do that, I went to the house and measured the room I will be working in and also measured each wall so I can begin the cutout process.